9 Tips That Will Save You the Most Credits on Kinova Studio
Kinova Team · April 2026
Whether you're running a faceless YouTube channel, building an AI influencer, or creating daily content for TikTok and Instagram Reels without ever filming yourself, the workflow is the same: write a script, generate scenes, produce clips, assemble your video. Kinova Studio is an AI video agent that handles this entire pipeline for you, with support for models like Seedance, Kling, and Veo.
But there's a difference between creators who burn through credits and creators who get great results on the first or second try. It's not luck. It's a handful of small habits that compound.
Here are the 9 tips that make the biggest difference, ranked by how much time and credits they'll actually save you.
🥇1. Check your scene images before generating clips
Credit impact: Massive.
This is the #1 thing you can do to improve your AI video generation success rate. Scene images are cheap. Clips are not. If there's a random extra plant in the background, a typo on a book cover, or a detail that doesn't match your story, catch it now. Regenerating a scene image costs a fraction of what a clip costs. Regenerating a clip because you didn't check? That adds up fast.
This matters especially for AI character consistency. If your AI avatar has the wrong outfit or expression in the scene image, that error carries into the clip. Before you hit "generate clip," zoom in. Look at every detail. If anything feels off, regen the scene image until it's right. Then move to clips.
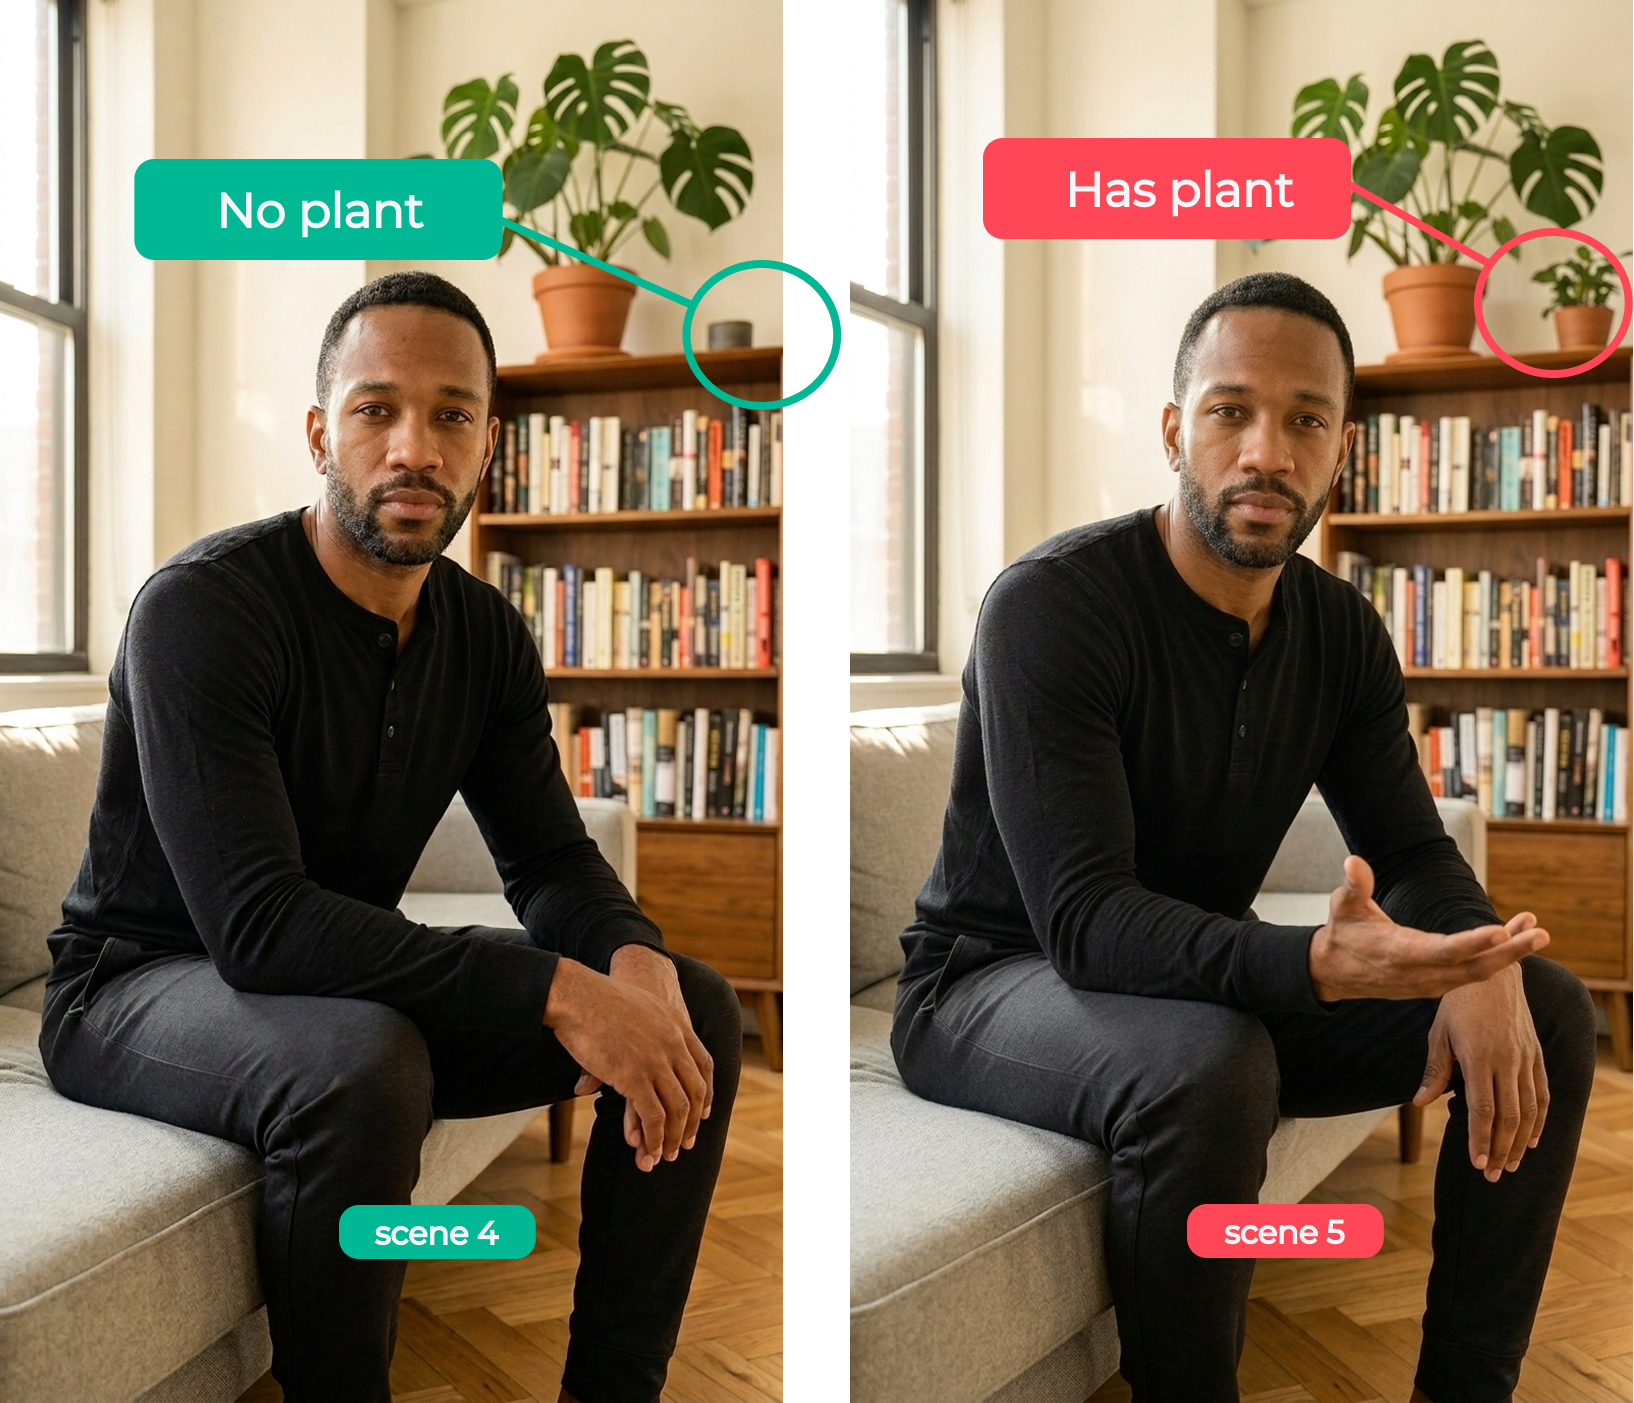
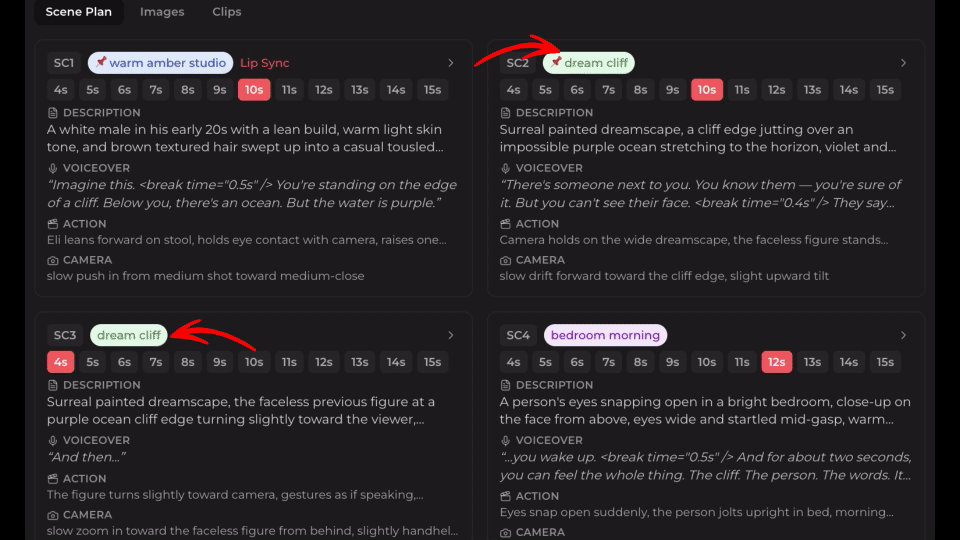
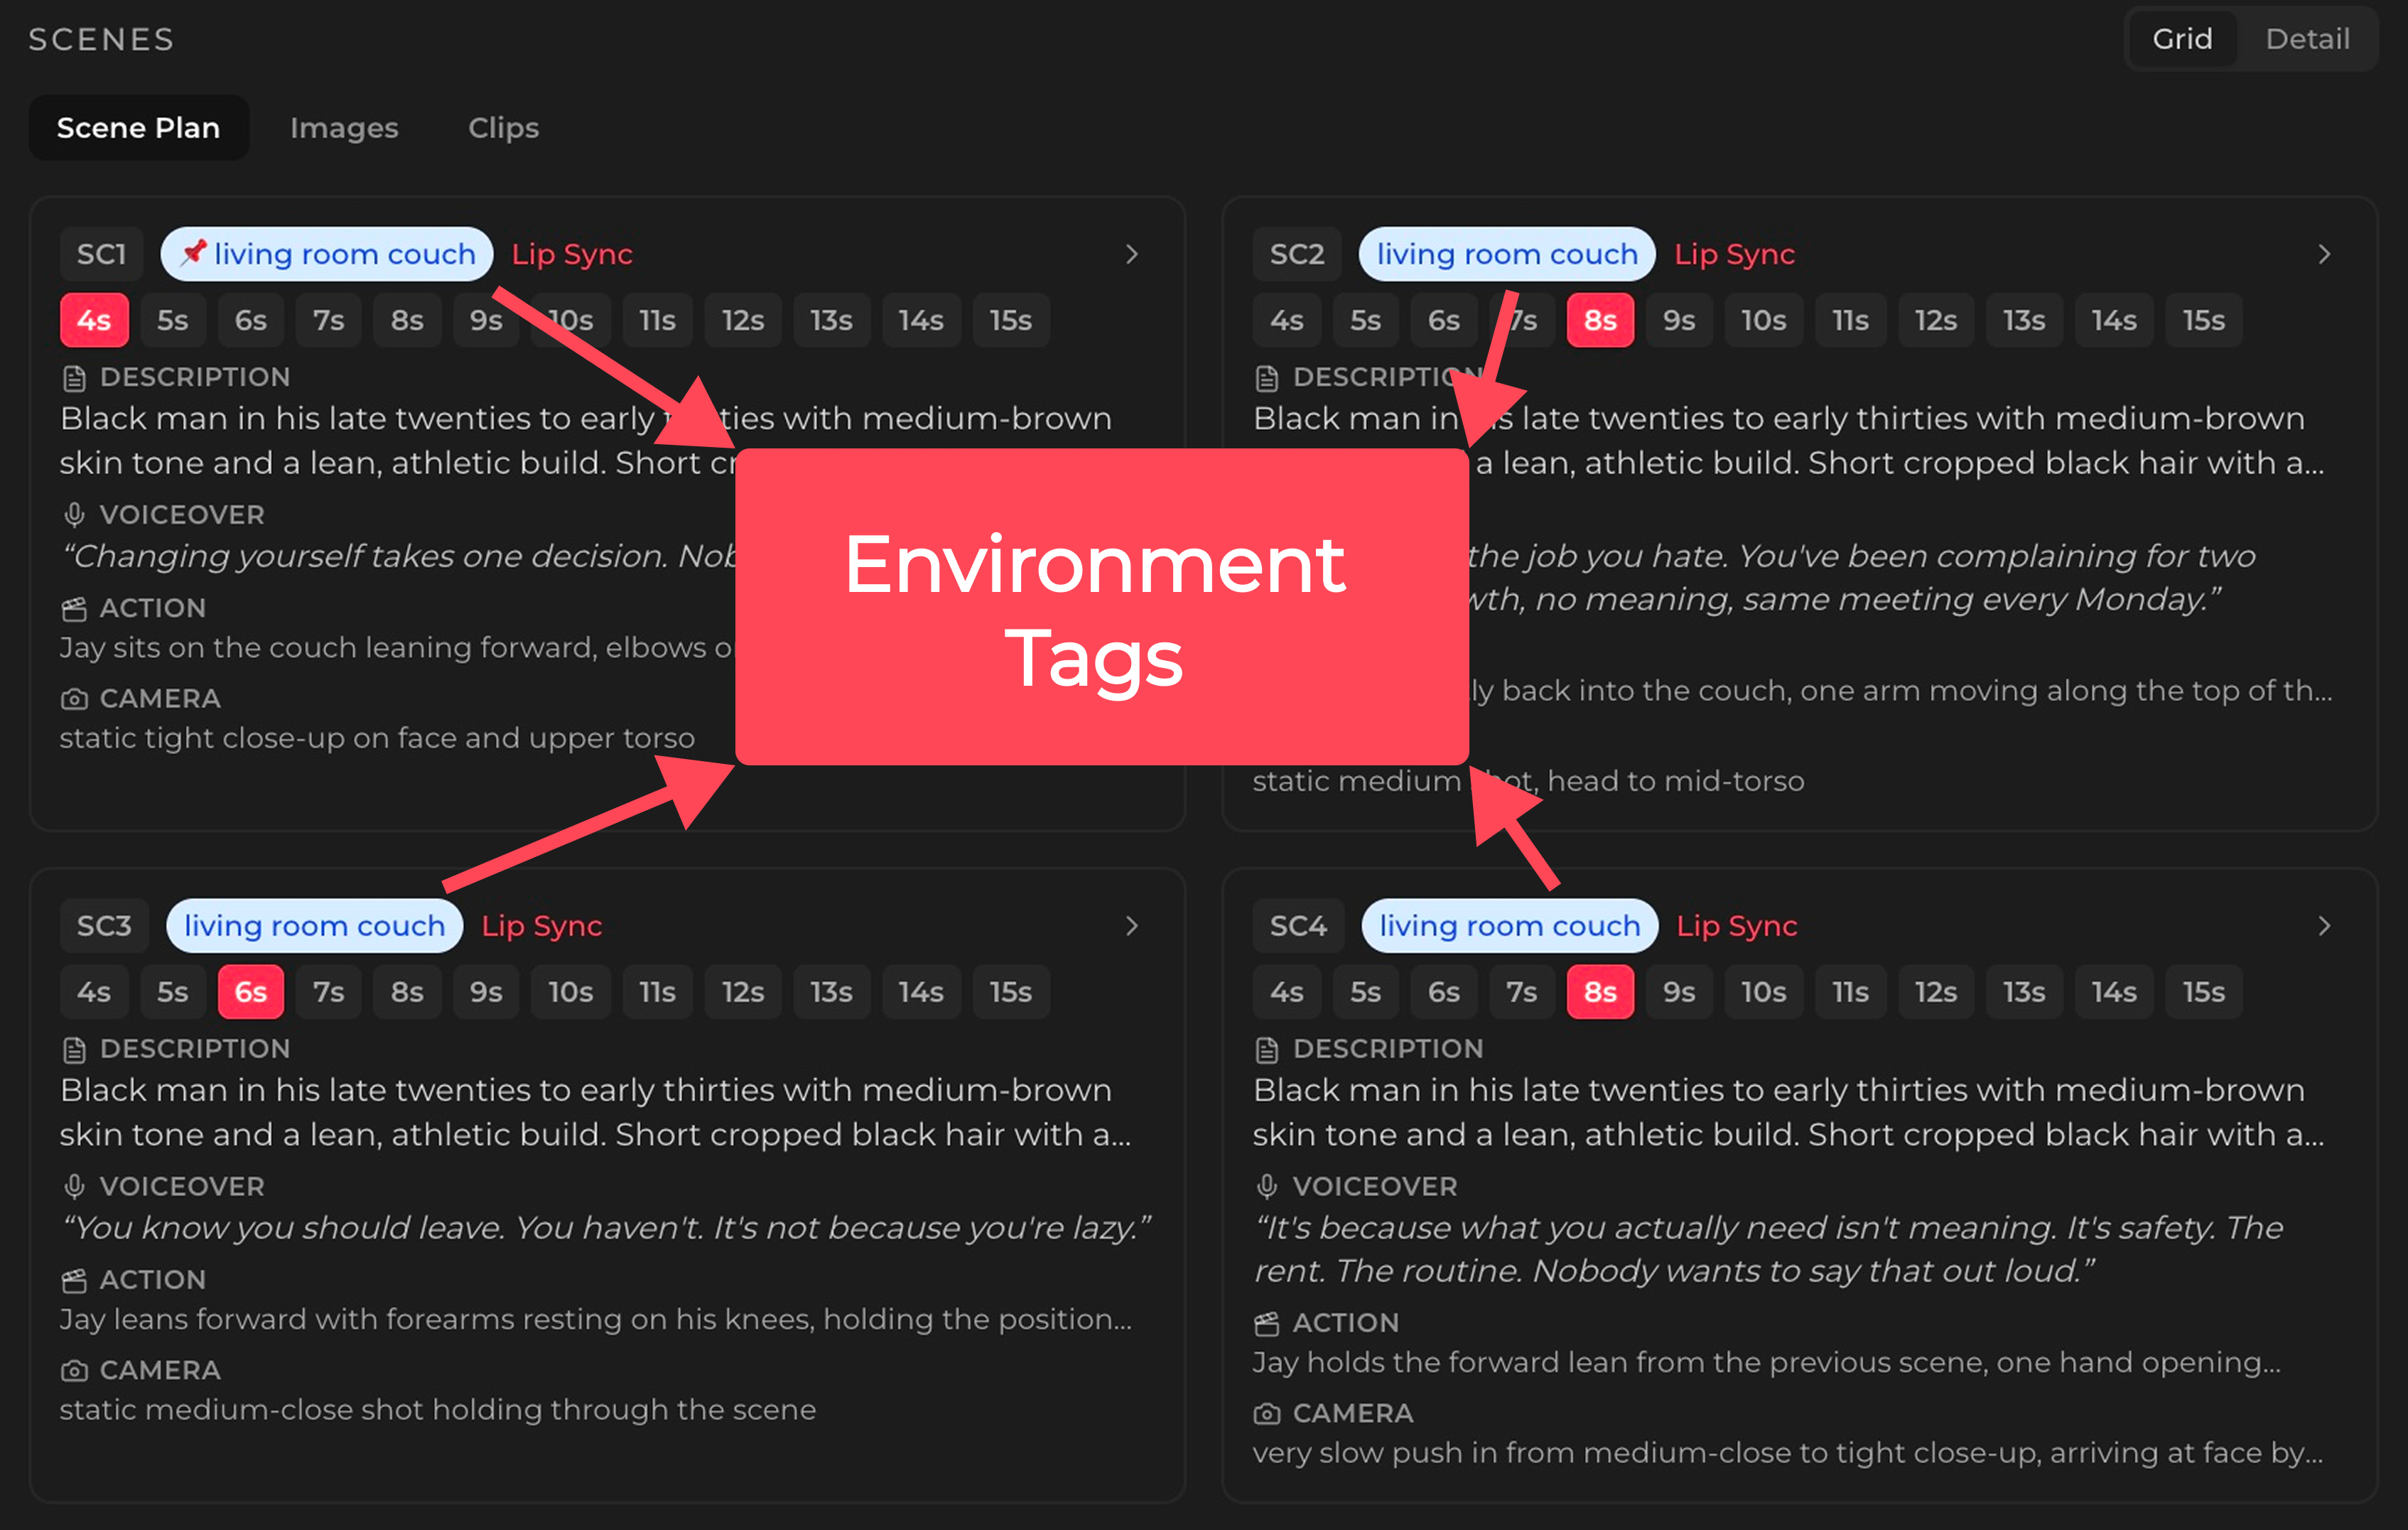
One thing to pay extra attention to: environment tags. In the Scene Plan tab, you'll see colored tags with a pin icon (like "dream cliff" or "bedroom morning") that indicate the location of each scene. If two scenes share the same tag, they're supposed to be in the same place. Switch to the Images tab, compare them side by side, and check if the backgrounds actually match. Same cliff, same ocean, same lighting. If they don't, regen before moving on. Fixing a mismatched background at the image stage is cheap. Discovering it after you've generated clips for both scenes is not.
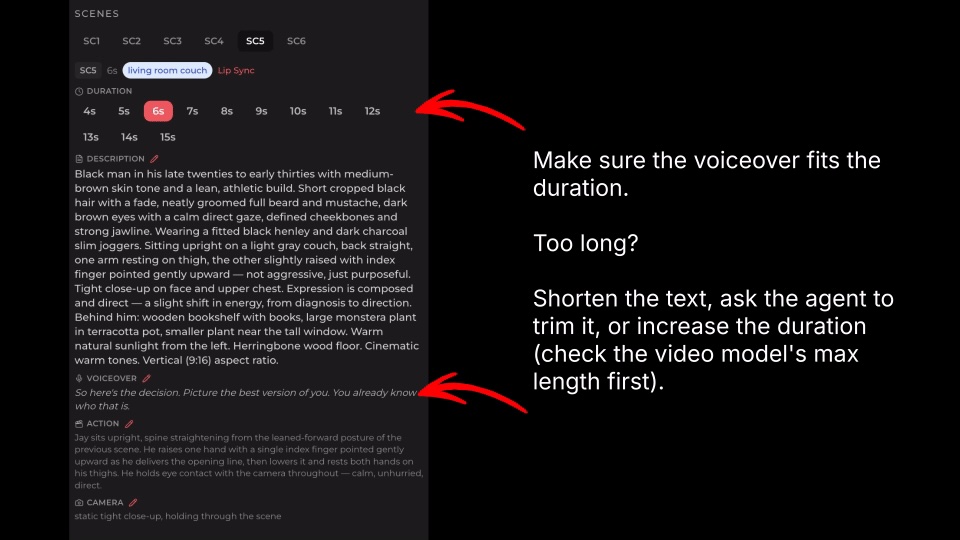
🥈2. Match your video length to the voiceover
Credit impact: High.
If your clip is a little longer than the voiceover, that's fine. The voice might play slightly slower than expected, and you can always trim the extra in post-production.
But if the clip is too short? The voice just cuts off mid-sentence. There's no fixing that. You have to regenerate the whole clip. This is especially painful for short-form content like AI videos for TikTok or YouTube Shorts, where every second counts and a cut-off line ruins the whole piece.
When planning scene duration, give yourself a second or two of buffer. It's the cheapest insurance you'll ever buy.
🥉3. Keep emotions consistent across scenes
Credit impact: High.
This one is subtle but expensive when you miss it. If your AI influencer character is calm and grounded throughout the video, one scene where they look overly excited breaks the entire vibe. If your AI avatar has a warm, lovely personality, a sudden serious expression feels jarring to viewers.
The fix is simple: review your scene plan with emotion in mind before you generate anything. One off-tone scene means regenerating that clip (or worse, realizing it in the final assembly and going back). For creators posting daily faceless videos, this kind of consistency is what makes an AI character feel like a real person your audience connects with.
4. Split scenes that are too long for the model
Credit impact: Medium to high.
Every AI video model has a maximum clip duration. Seedance supports up to 15 seconds per clip. Kling and Veo have their own limits. If your planned scene is longer than what the model can handle, the generation will either fail or produce something unusable. Either way, you're spending credits for nothing.
The fix: tell the agent to split it. Something like "split scene 2 into 2 scenes, one with voiceover 'I've been thinking about this for a while', the other with 'and here's what I realized'." The agent handles the rest. Two shorter, successful clips are always better than one failed long one.
5. Keep environment tags consistent
Credit impact: Medium.
You'll notice environment tags (with a pin icon) on your scenes. These indicate location. Scenes sharing the same tag are meant to look visually consistent, like they're in the same room or setting. This is a key part of how Kinova maintains AI character consistency across your entire video.
Here's where people trip up: they update the image for one scene but forget about the other scenes with the same tag. Now you have two scenes that are supposed to be the same living room, but the couch is different. That means regenerating images (and potentially clips) for all the mismatched scenes.
When you update a scene image, check if other scenes share that environment tag. Update them all together.
6. Generate in batches, not all at once
Credit impact: Medium.
It's tempting to hit "generate all clips" and walk away. But if scene 2 has an issue, you won't catch it until after you've already generated scenes 3 through 10. That's wasted credits on clips you might need to redo anyway.
Work in smaller batches: "generate images for sc1-sc4," review, then "generate clips for sc1, sc5." You catch problems earlier, iterate faster, and spend less overall. This is especially useful when you're still learning how a particular video model (Seedance, Kling, or Veo) handles your content style.
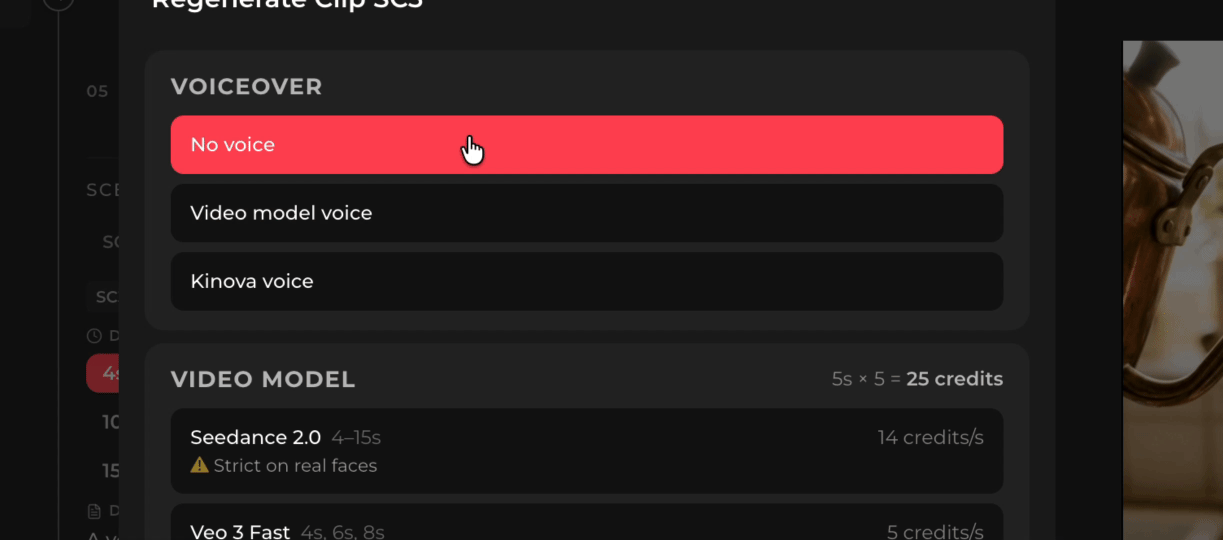
7. Know your voiceover modes
Credit impact: Medium.
Getting voiceover wrong means regenerating clips with the right voice settings. Here's the quick breakdown:
Every scene is labeled Lip sync, Narration, or No voice. Lip sync means the character speaks on camera and their mouth moves with the audio. Narration means the voiceover plays over the visuals with no visible speaker — common in faceless video content. No voice means a silent scene (B-roll, music-only, ambient). The scene planner picks the default based on the shot; you can flip it per scene in the editor.
For voice control: use the video provider's built-in voice if you don't need precise control. If you want a consistent voice across your video (which you usually do for an AI influencer or AI content creator channel), select "Kinova voice" and pick from the popup. Setting this up correctly the first time saves you from re-doing clips later.
8. Replan scenes instead of starting over
Time impact: High. Credit impact: Low (but prevents waste).
Your scene plan isn't set in stone. If something doesn't feel right after reviewing, just type what you want to change. "Make scene 3 more upbeat" or "swap the order of scenes 4 and 5." The agent adjusts the plan based on your instructions.
This doesn't cost credits, it's just planning. But getting the plan right before you generate saves you from burning credits on scenes you'll throw away. Think of the agent as a creative partner, not a one-shot tool.
9. Ask the agent to retry
Time impact: Medium. Credit impact: Low per use.
If something looks wrong, don't overthink it. Just say "retry image generation for sc3." The agent regenerates it. No need to start over, no need to figure out workarounds, no need to manually tweak prompts.
It's the simplest tip on this list, but people forget they can do it. The agent is there to help. Use it.
The pattern
If you look at the top tips, they all share the same idea: catch problems early, when they're cheap to fix. Scene images before clips. Voiceover length before generation. Emotions before you commit. The later you catch an issue, the more credits it costs to fix.
Don't be afraid to experiment. Most of the process is reiterable. Iterate smart: start cheap, verify, then commit.
What is Kinova Studio?
Kinova Studio is an AI video agent that helps content creators produce consistent, character-based videos without filming. Write your script, and Kinova's AI agent plans your scenes, generates images and video clips using models like Seedance, Kling, and Veo, and assembles the final video.
It's built for creators who want to post daily on TikTok, YouTube Shorts, and Instagram Reels without needing a camera, studio, or editing skills. Whether you're creating a faceless YouTube channel, building an AI avatar for social media, or launching an AI influencer brand, Kinova handles the video production so you can focus on the story.